How to Setup Fizfy?
- Login at Fizfy App at https://app.fizfy.com/login

- Click on Create Campaign you will see Popup Create New Campaign : Name , Domain / Sub domain and Include Sub domains ( Toggle) So you need to Enter name , You can use any Name you want for your Campaign and Domain / Sub domain use your Website URL. Make Sure you added Domain URL Correctly If your domain https://www.example.com/ then add Domain like www.example.com And If URL is https://example.com/ then add Domain example.com during campaign Creation. Click on Toggle enable Include Sub domains and submit it.

- Next Step is to Add Pixel Code in Head Tag at your Website. Copy Pixel from Account Settings – Add Pixel Code and paste it to your head Tags <head></head> at your website.

- Click on Campaigns Navigate and Click on List of Campaigns.

- You will see List of Campaigns created and domain you will see So Click on Domain which you added.

- When you will click on Domain at List of Campaigns Page, then page will redirect to Campaign Notifications.
- At Campaign Notifications Page you will see Button New Notifications.
- Click on Button New Notification

- When you will click on Button New Notifications You will see there are 42 Widget Tools, You can choose any Widget based on your Choice.
- Next will be redirected to Settings Page and make sure you enabled Widget by click on Toggle ( It will Trun Green when it will be on)
 Create Recent Activity Widget: Select Option Recent Activity and Name you can use any Like Recent Activity and Click on Submit. When you will click on Submit then Page will go to preview Page. You will see Toggle ,Click on Toggle On/OFFIf you want make any changes in Title and Description Message then you can and Click on Submit.Now browse your Website which is added in campaign in Another Tab Browser. You will see Notification appear of recent activity which is created.
 - Create Coupon Code Widget: Now Next is to create Widget Coupon Code, Click on Campaigns – List of Campaigns – Click on Domain then At Campaign Notifications Page you will see Button : New Notifications Click on Button New Notification, You will see Option Coupon Code Select that Option Coupon Code and Enter Name – Coupon Code then Click on Submit. Now Enter Title Message, Description Message and you can add any Coupon Code and then Submit. You will see Toggle at Top Left Click on that and Enable. Now browse your Website which is added in campaign in Another Tab Browser. You will see Notification appear of Coupon Code which is created.
- Create Visitors Widget: Now Next is to create Widget Visitors, Click on Campaigns – List of Campaigns – Click on Domain then At Campaign Notifications Page you will see Button : New Notifications Click on Button New Notification, You will see Option Visitors Select that Option Visitors and Enter Name – Visitors then Click on Submit. Now you can change Description Message and you can add more hours like 400 in Count Data from last X minutes and then Submit. You will see Toggle at Top Left Click on that and Enable. Now browse your Website which is added in campaign in Another Tab Browser. You will see Notification appear of Visitors which is created.
- Create Mail Collector Widget: Now Next is to create Widget Mail Collector, Click on Campaigns – List of Campaigns – Click on Domain then At Campaign Notifications Page you will see Button : New Notifications Click on Button New Notification, You will see Option Mail Collector Select that Option Mail Collector and Enter Name – Mail Collector then Click on Submit. Now you can change Title Message, Description Message upon needs and then Submit. You will see Toggle at Top Left Click on that and Enable. Now browse your Website which is added in campaign in Another Tab Browser. You will see Notification appear of Mail Collector which is created.
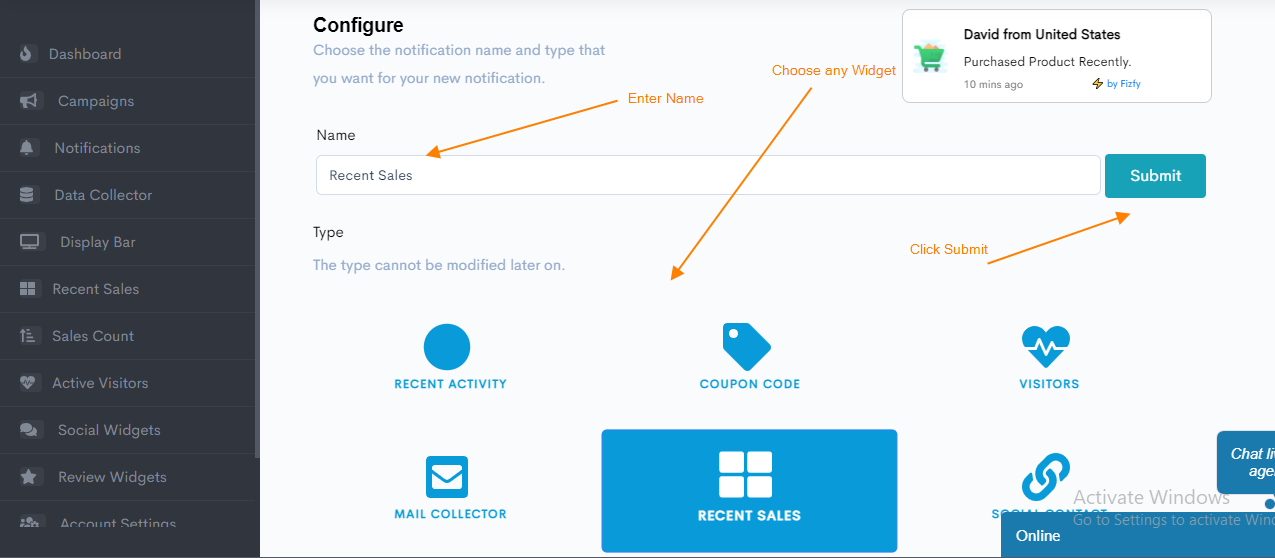
- Create Recent Sales Widget: Now Next is to create Widget Recent Sales, Click on Campaigns – List of Campaigns – Click on Domain then At Campaign Notifications Page you will see Button : New Notifications Click on Button New Notification, You will see Option Recent Sales Select that Option Recent Sales and Enter Name – Recent Sales then Click on Submit. Now you can change Title Message, Description Message upon needs and then Submit. You will see Toggle at Top Left Click on that and Enable.
Now browse your Website which is added in campaign in Another Tab Browser. You will see Notification appear of Recent Sales which is created.
- Create Sales Count Widget: Now Next is to create Widget Sales Count, Click on Campaigns – List of Campaigns – Click on Domain then At Campaign Notifications Page you will see Button : New Notifications Click on Button New Notification, You will see Option Sales Count Select that Option Sales Count and Enter Name – Sales Count then Click on Submit. Now you can change Count data from last X hours – 400 and then Submit. You will see Toggle at Top Left Click on that and Enable.
Now browse your Website which is added in campaign in Another Tab Browser. You will see Notification appear of Sales Count which is created.
- Create Social Contact Widget: Now Next is to create Social Contact, Click on Campaigns – List of Campaigns – Click on Domain then At Campaign Notifications Page you will see Button : New Notifications Click on Button New Notification, You will see Option Social Contact Select that Option Social Contact and Enter Name – Social Contact then Click on Submit. Now if you want modifications then you can change Title Message, Description Message upon needs and then Submit. You will see Toggle at Top Left Click on that and Enable. Now browse your Website which is added in campaign in Another Tab Browser. You will see Notification appear of Social Contact which is created.